
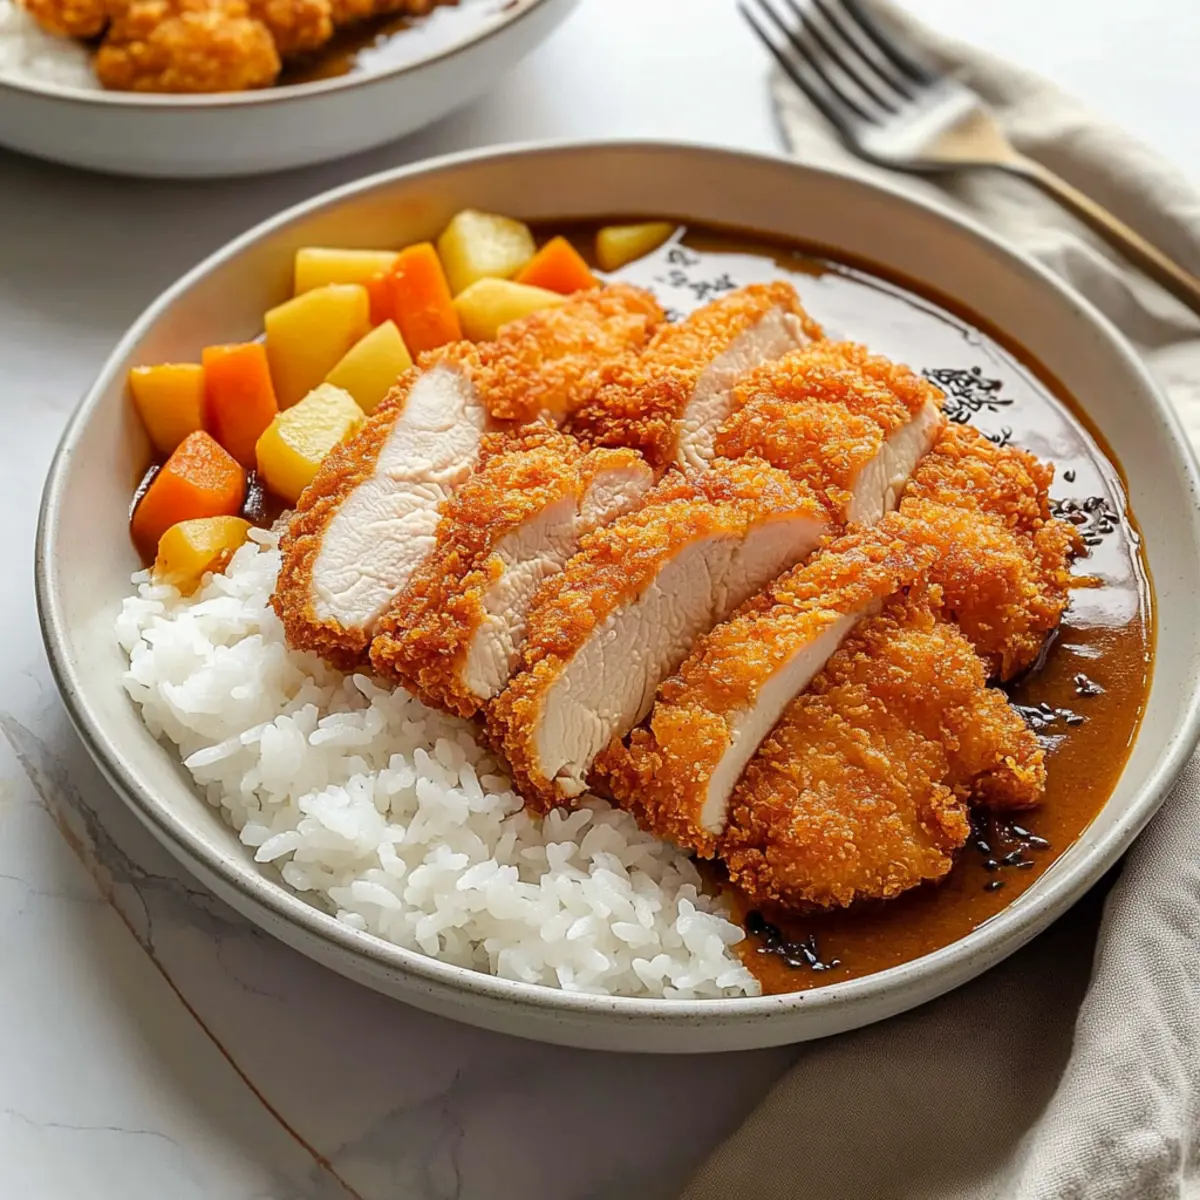
As I craved something both comforting and satisfying the other day, thoughts of Japanese Katsu Curry danced in my mind. The enticing image of golden, crispy chicken coated in panko breadcrumbs, drenched in a rich, umami-filled curry sauce over soft white rice made my stomach rumble with anticipation. This delightful recipe not only delivers a crowd-pleasing dinner in under an hour, but it also allows you to adapt it to your taste preferences—whether you choose succulent chicken, tender pork, or a veggie-packed tofu option, there’s a variation for everyone. The secret? A convenient premade curry roux, enhanced with sweet grated apple and honey, takes this dish over the top! Ready to experience the warmth of this Japanese comfort food? Let’s dive into the recipe and transform your weeknight meals into something truly special.
Why is Japanese Katsu Curry so Irresistible?
Comforting, It’s the ultimate hug-in-a-bowl, combining crispy chicken with a rich, savory curry sauce that warms your soul. Quick and Easy, This recipe comes together in under an hour, making it a breeze for busy weeknights. Customizable, Enjoy the flexibility to swap in pork, beef, or tofu based on your preference—there’s a delicious option for everyone! Family-Friendly, It’s a guaranteed crowd-pleaser that will leave everyone asking for seconds, much like my Chicken Curry Coconut recipe. Epic Flavor, Thanks to the unique blend of sweet apple and savory soy sauce, every bite is a flavorful explosion that elevates your dinner game. Perfect Pairing, Serve it over fluffy white rice for that perfect bite of comfort every time!
Japanese Katsu Curry Ingredients
• Here’s everything you need to create this delightful dish!
For the Chicken
- Chicken Breasts – The star of the show; choose organic for the best flavor!
- Salt – Elevates the taste; don’t skip this step!
- Black Pepper – Adds just the right touch of heat to the chicken.
- All-Purpose Flour – Helps create a sturdy base for the crispy coating.
- Egg – Binds those breadcrumbs; use fresh for the best results.
- Panko Breadcrumbs – Light and crispy, essential for that perfect crunch.
- Vegetable Oil – For frying; a neutral oil like canola will work perfectly.
For the Curry Sauce
- Japanese Curry Roux – The heart of your sauce; choose mild for kids or spicy for adults!
- Yellow Onion – Adds natural sweetness and depth to the curry.
- Russet Potato – Makes the curry hearty; substitute with Yukon Gold for a creamier texture.
- Carrot – Provides color and sweetness; cut into bite-sized pieces for even cooking.
- Olive Oil – For sautéing the vegetables; adds a lovely flavor.
- Garlic – Aromatic and adds a rich flavor to the curry sauce.
- Red Apple – Sweetens the curry naturally; any sweet variety will do!
- Chicken Stock – Creates a savory base; use vegetable stock for vegetarian katsu curry.
- Water – Adjust the consistency of your curry sauce; add as needed.
- Soy Sauce – Adds umami richness; tamari works for gluten-free versions.
- Honey – Balances the flavors beautifully with its sweetness.
For Serving
- Cooked White Rice – The perfect base; jasmine or sticky rice works wonderfully!
Step‑by‑Step Instructions for Japanese Katsu Curry
Step 1: Prepare Chicken
Start by butterflying and tenderizing the chicken breasts to about ½ inch thickness, which helps achieve even cooking and tenderness. Season both sides generously with salt and black pepper. Then, set the chicken aside as you prepare for the breading process, which will give the chicken katsu that irresistible crispy exterior.
Step 2: Breading Process
In three shallow dishes, set up your breading station with all-purpose flour, a beaten egg, and panko breadcrumbs. First, coat each piece of seasoned chicken in flour, shaking off any excess. Next, dip it into the beaten egg to ensure the breadcrumbs adhere, and finally, press the chicken firmly into the panko breadcrumbs until fully coated. This creates the perfect texture for your katsu.
Step 3: Fry Chicken
Heat vegetable oil in a large skillet over medium heat until it reaches 340°F (170°C). Carefully add the breaded chicken, frying for about 6-7 minutes on each side until golden brown and crisp. Use tongs to flip the chicken halfway through for even cooking, then transfer the fried katsu to a wire rack to drain excess oil, ensuring it stays crunchy.
Step 4: Cook Vegetables
In another pan, add olive oil and sauté chopped onions and minced garlic until translucent and fragrant, about 2-3 minutes. Next, add diced carrots and russet potatoes, cooking for an additional 2 minutes while stirring. This step builds the foundation of flavors for your Japanese katsu curry, bringing out the sweetness of the vegetables.
Step 5: Make Curry Sauce
Pour in the chicken stock and enough water to cover the vegetables, then stir in soy sauce, honey, and grated red apple to infuse sweetness into your curry. Bring to a simmer and continue cooking for around 15 minutes, or until the vegetables are tender and the flavors have melded together beautifully, creating a warm and comforting sauce.
Step 6: Thicken Sauce
Once the vegetables are tender, stir in the Japanese curry roux, breaking it into smaller pieces for quick incorporation. Allow the mixture to simmer for another 15 minutes, stirring occasionally until it thickens into a rich and velvety sauce that envelops each ingredient. This mouthwatering curry sauce harmonizes perfectly with the crispy chicken.
Step 7: Serve
To serve your delicious Japanese katsu curry, slice the crispy chicken katsu into strips and place them over a generous bed of fluffy cooked white rice. Ladle the thick curry sauce over the chicken, allowing it to seep into the rice. This presentation not only makes for a visually stunning dish but also ensures every bite is a delightful mix of textures and flavors.
What to Serve with Crispy Chicken Katsu Curry
Enhance your dining experience with delightful sides that perfectly complement this savory Japanese comfort dish.
- Steamed Broccoli: This green veggie adds a fresh crunch and vibrant color, balancing the richness of the curry with its mild flavor.
- Pickled Cucumbers: The tangy, refreshing taste of pickles elevates the meal and cleanses your palate between bites of the hearty katsu curry.
- Japanese Pancakes: Soft and fluffy, these sweet treats provide a delightful contrast to the savory curry while adding a touch of sweetness to your plate.
- Miso Soup: A warm bowl of miso soup enhances the umami experience of your meal and adds a comforting touch of tradition to the table.
- Fruit Salad: A light, vibrant fruit salad brings a refreshing burst of sweetness that beautifully contrasts the savory flavors of the curry.
- Green Tea: Pair your meal with a soothing cup of green tea; its earthy notes and warmth complement the dish, enhancing the overall dining experience.
- Japanese Eggplant: Grilled or sautéed, this tender vegetable adds a unique texture and flavor that marries well with the rich curry sauce.
- Chilled Tofu Salad: Light and refreshing, tofu topped with sesame dressing provides a protein-packed side that’s perfect for balancing the richness of katsu curry.
Storage Tips for Japanese Katsu Curry
Room Temperature: Store any leftover katsu curry at room temperature for no more than 2 hours to prevent bacterial growth.
Fridge: Keep leftover Japanese katsu curry in an airtight container in the fridge for up to 3 days. This ensures your meal stays fresh and delicious for those busy weeknights!
Freezer: For longer storage, freeze the katsu curry in a sturdy, freezer-safe container for up to 3 months. Thaw it in the refrigerator overnight before reheating.
Reheating: To reheat, warm the curry on the stovetop over low heat, adding a splash of water if necessary to regain its creamy texture. Enjoy your comforting katsu curry once again!
Variations & Substitutions for Japanese Katsu Curry
Feel free to play around with this recipe and make it your own with these tasty options!
- Pork Option: Substitute chicken with pork loin or tenderloin for a delicious twist that pairs beautifully with the curry sauce.
- Beef Alternative: For a heartier version, use thinly sliced beef; it will cook quickly and soak up the rich flavors of the curry.
- Seafood Delight: Shrimp or fish fillets can serve as a light alternative, adding a lovely variation of flavor to this comforting dish.
- Tofu Replacement: Make it vegetarian by swapping the chicken for firm tofu, perfectly pan-fried for a crispy bite that holds the curry flavor well. Enjoy this texture twist as it complements the sauce beautifully!
- Spicy Kick: Look for a spicy Japanese curry roux if you prefer some heat, or simply add chili flakes to the curry sauce to customize your spice level.
- Veggie Boost: Toss in more vegetables such as bell peppers, peas, or squash to enhance the dish’s nutrition. This adds vibrancy and freshness to the curry!
- Gluten-Free Swap: For a gluten-free option, use gluten-free panko and tamari instead of soy sauce. It’s easy to enjoy a comforting meal without compromising dietary needs.
- Sweetness Contrast: Add a pinch of sugar or maple syrup to balance out any spicy flavors, enhancing the overall taste harmony of the curry.
No matter how you choose to customize your Japanese Katsu Curry, I hope these suggest you to embrace the flavors and make it a delightful meal every time!
Make Ahead Options
These Japanese Katsu Curry components are perfect for meal prep enthusiasts! You can bread and fry the chicken katsu up to 24 hours in advance, keeping it crisp by refrigerating it on a wire rack to prevent sogginess. Additionally, the curry sauce can be made up to 3 days ahead; simply store it in an airtight container in the refrigerator to maintain its rich flavors. When you’re ready to serve, reheat the curry sauce on the stove while popping the breaded chicken in the oven for a few minutes to re-crisp the coating. This way, you’ll enjoy a comforting, homemade meal that feels fresh and delicious, even on your busiest nights!
Expert Tips for Japanese Katsu Curry
- Choose Quality Chicken: Opt for free-range or organic chicken breasts for the best flavor and tenderness; it makes a noticeable difference in your katsu curry.
- Perfect Breading: Ensure your chicken is well-coated by gently pressing the panko breadcrumbs into the surface, which helps create that satisfying crunch.
- Oil Temperature Matters: Use a thermometer to keep the frying oil at 340°F; frying at too low a temperature can lead to greasy chicken.
- Vegetable Prep: Cut potatoes and carrots into similar sizes for even cooking, ensuring that all vegetables reach the desired tenderness together in the curry sauce.
- Thicken Right: Don’t rush the simmering process for the curry sauce—allow time for flavors to meld and for the sauce to reach that perfect thickness for your Japanese katsu curry.
- Substitutions Made Easy: Feel free to swap chicken for pork, beef, or tofu to suit your preferences—each variation brings its own delicious twist to this comfort dish.
Japanese Katsu Curry Recipe FAQs
How do I choose ripe vegetables for my katsu curry?
Absolutely! For any vegetables in your katsu curry, like carrots and potatoes, look for firm, smooth skins without dark spots or blemishes. A good potato should feel heavy for its size, and carrots should be bright orange and crisp. Ideally, choose onions with tight, unblemished skins to ensure they have the best flavor.
How should I store leftover katsu curry?
Very! To store unused katsu curry, transfer it to an airtight container and refrigerate. It can safely last for up to 3 days. If you want to keep it longer, consider freezing it! Just remember to cool it completely before sealing it in a freezer-safe container to prevent freezer burn.
Can I freeze katsu curry and if so, how?
Absolutely! You can freeze your katsu curry for up to 3 months. After letting it cool down completely, ladle the curry into a sturdy, freezer-safe container, leaving some room for expansion. Make sure to label it with the date. When you’re ready, thaw it overnight in the refrigerator before reheating gently on the stove, adding a touch of water if the sauce looks too thick.
What should I do if my curry sauce is too thin?
If your curry sauce turns out thinner than expected, don’t worry! Simply let it simmer on low heat for a few more minutes to allow excess moisture to evaporate. Alternatively, you can mix a small amount of cornstarch with cold water to create a slurry, then stir it into your simmering sauce. This should help thicken it up nicely.
Are there any dietary considerations for katsu curry?
Very much so! If you’re cooking for someone with food allergies, make sure to check the labels of your ingredients, especially for the curry roux, soy sauce, and any stock you use. For gluten-free options, look for gluten-free panko breadcrumbs and soy sauce (like tamari). If making it vegetarian, simply replace chicken stock with vegetable broth and use tofu in place of chicken.
How do I prevent the breading from getting soggy?
Great question! To keep your crispy chicken katsu golden and crunchy, make sure to drain it on a wire rack instead of paper towels after frying; this prevents steam from making the breading soggy. Additionally, frying at the right temperature—about 340°F (170°C)—is key, as it ensures the breading crisps up nicely without absorbing excess oil.

Irresistibly Cozy Japanese Katsu Curry for Ultimate Comfort
Ingredients
Equipment
Method
- Prepare the chicken by butterflying and tenderizing to ½ inch thickness. Season with salt and black pepper.
- Set up a breading station with flour, beaten egg, and panko breadcrumbs. Coat chicken in flour, then egg, and finally panko.
- Heat vegetable oil in a skillet over medium heat. Fry the chicken for 6-7 minutes on each side until golden brown.
- Sauté onions and garlic in olive oil until translucent, then add carrots and potatoes for an additional 2 minutes.
- Pour in chicken stock and water, stir in soy sauce, honey, and grated apple. Simmer for 15 minutes.
- Stir in Japanese curry roux and simmer for another 15 minutes until the sauce thickens.
- Slice the chicken and serve over white rice, ladling the thick curry sauce on top.
Leave a Reply