
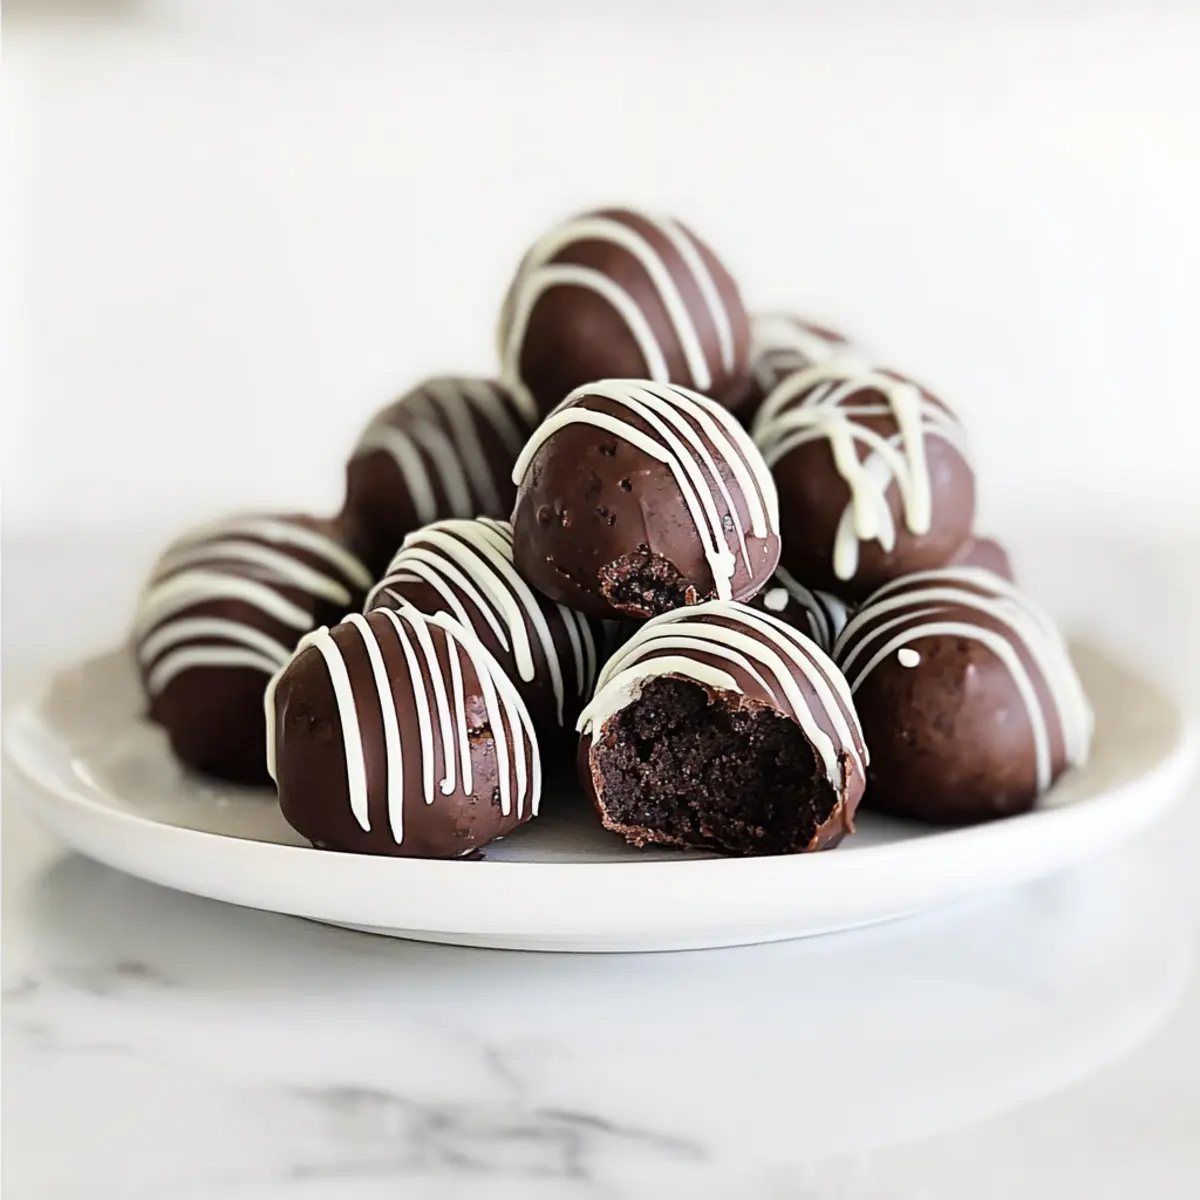
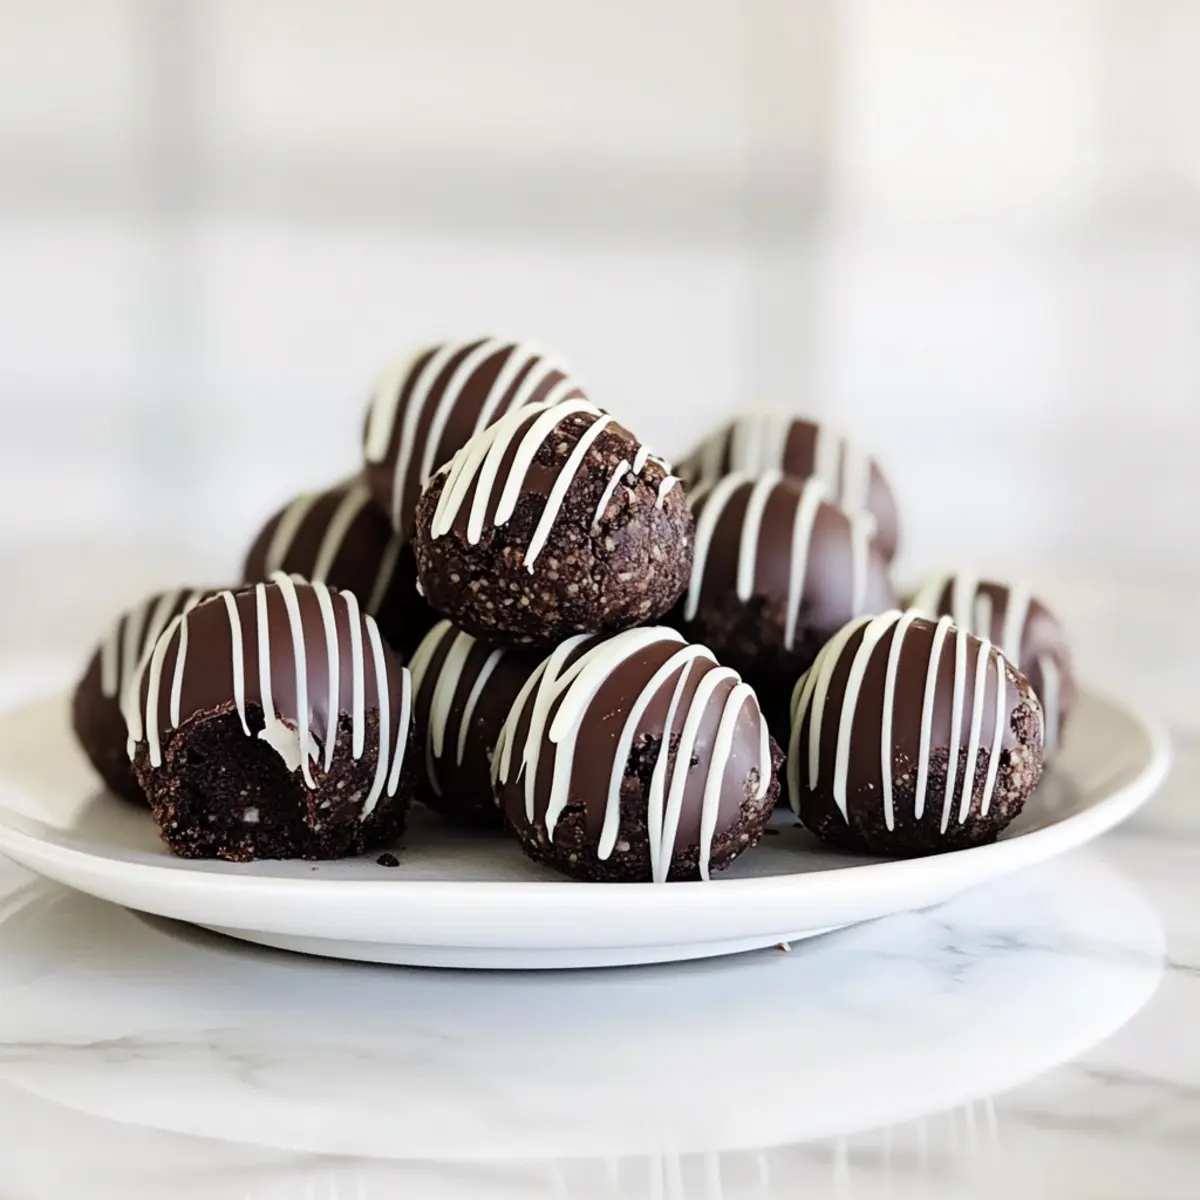
In a world buzzing with culinary creations, sometimes the simplest delights stand out the most. These No-Bake Gluten-Free Oreo Balls are a testament to just that, showcasing how effortless and satisfying dessert-making can be with only three ingredients. With their rich chocolatey taste and creamy texture, they promise to captivate both kids and adults. Plus, their quick prep time means you can whip them up in a flash, making them perfect for any gathering or last-minute sweet tooth cravings. Whether you’re gluten-sensitive or simply looking to indulge without the fuss, these delectable treats will make everyone feel included at the dessert table. Curious about how to bring this delightful recipe to life? Let’s dive in!
Why love these Gluten-Free Oreo Balls?
Simplicity: With only three ingredients, these treats are a breeze to make. Whether you’re a seasoned chef or a kitchen novice, this recipe is truly foolproof.
Delectable Flavor: Imagine the harmonious blend of rich chocolate and creamy sweetness, making each bite a blissful experience.
Versatile Treat: Perfect for parties, holidays, or an everyday snack, these Oreo balls cater to all occasions and preferences.
No Baking Required: Save time and effort in the kitchen with this no-bake recipe that lets you enjoy dessert without the fuss of traditional baking.
And if you’re in the mood for more gluten-free delights, check out these Gluten Free Cookies and make your dessert table even more tempting!
Gluten-Free Oreo Balls Ingredients
For the Base
• Oreo Cookies – The essential base providing sweetness and structure; feel free to substitute with regular gluten-free cookies for a similar texture.
• Cream Cheese – Adds a rich creaminess and binds everything together; for a dairy-free option, use a vegan cream cheese alternative.
For the Coating
• Chocolate (milk, white, or dark) – This delicious coating enhances your Oreo balls; choose your favorite based on how sweet you want your treat to be.
With the right ingredients gathered, you’re one step closer to enjoying these mouthwatering Gluten-Free Oreo Balls! Now, let’s get to the fun part—creating these delightful bites!
Step‑by‑Step Instructions for Gluten-Free OREO Balls
Step 1: Crush the Oreo Cookies
Start by placing the gluten-free Oreo cookies into a food processor. Pulse them until they are finely crushed, resembling breadcrumb consistency. This should take about 30 seconds. You want a smooth texture to provide the perfect base for your cookies. Once crushed, transfer the crumbs to a mixing bowl to prepare for the next step.
Step 2: Combine with Cream Cheese
Next, add the softened cream cheese to the bowl with the crushed Oreo cookies. Using a spatula or your hands, mix them together until well combined and the mixture is creamy. This may take around 2-3 minutes. The result should be a cohesive dough that holds together when rolled. This rich blend is the heart of your Gluten-Free OREO Balls.
Step 3: Form the Balls
With your mixture ready, scoop out about a tablespoon of the Oreo cream mixture and roll it into a small ball about one inch in diameter. Place each ball onto a parchment-lined baking sheet, ensuring they are spaced apart. This process should take about 10 minutes, and you can keep your hands slightly damp to prevent sticking.
Step 4: Freeze to Firm Up
Now, transfer the baking sheet to your freezer and let the Oreo balls chill for 15 minutes. This step is crucial as it helps the balls firm up, making them easier to dip in chocolate later. When ready, they should be slightly firm to the touch, allowing you to work with them smoothly.
Step 5: Melt the Chocolate
While the Oreo balls are freezing, prepare to melt your chosen chocolate. Place the chocolate in a microwave-safe bowl and heat in 30-second intervals, stirring in between, until fully melted and smooth—this typically takes around 1-2 minutes. Once melted, let it cool slightly to avoid burning your fingers when dipping.
Step 6: Dip the Oreo Balls
Now, take each frozen Oreo ball and carefully dip it into the melted chocolate. Use a fork to coat each ball fully, allowing any excess chocolate to drip off. Return the coated treats to the parchment-lined baking sheet. This step allows for that delicious chocolate shell, making these Gluten-Free OREO Balls extra indulgent.
Step 7: Drizzle and Garnish
After all the balls are coated, you can drizzle with any remaining melted chocolate for a beautiful finish. Simply pour it into a piping bag (or a resealable plastic bag with the corner clipped) and create swirling patterns over the balls. If desired, sprinkle extra crushed Oreo crumbs on top to enhance presentation and flavor contrast.
Step 8: Chill Until Set
Finally, refrigerate the finished Oreo balls for at least one hour to allow the chocolate to fully set and harden. Once firm, they are ready to be enjoyed! You can serve these delightful gluten-free treats at parties, as a tasty snack, or even as a sweet surprise for special occasions.

Gluten-Free OREO Balls Variations & Substitutions
Feel free to let your creativity shine and make these delightful treats your own with these tasty suggestions!
-
Dairy-Free: Substitute cream cheese with a vegan cream cheese alternative for a delicious dairy-free version. You’ll still enjoy that creamy goodness.
-
Flavorful Coatings: Try using unique flavored chocolates, like dark chocolate with sea salt for a savory twist or mint-flavored chocolate for a refreshing spin. Each option brings a new experience to the taste buds.
-
Nutty Crunch: Add finely chopped nuts or crushed pretzels to the Oreo mixture for added texture and a crunchy surprise. The contrast between creamy and crunchy is simply divine!
-
Sweet & Salty: Sprinkle a touch of sea salt on top before the chocolate sets. This sweet-salty combo creates an irresistible depth of flavor that will keep everyone coming back for more.
-
Fun Dips: Instead of straight chocolate, try a white chocolate drizzle or even a colorful candy coating. This adds visual flair to your treats, making them more inviting for any occasion.
-
Seasonal Twists: Incorporate seasonal ingredients like pumpkin spice in the fall or peppermint in winter for a festive twist. These small adjustments can change the entire vibe of your treats!
-
Alternative Cookies: Swap gluten-free Oreos for any gluten-free chocolate sandwich cookies you love for a slightly different taste. Experiment and find the perfect combination that meets your craving!
-
Protein Boost: Mix in a scoop of your favorite protein powder to the Oreos and cream cheese for a fun twist. This makes for a great post-workout treat that’s satisfying and delicious!
And if you’re in the mood for more gluten-free delights, don’t miss out on trying these Gluten Free Cookies. Each suggestion creates a new opportunity for enjoyment!
What to Serve with No-Bake Gluten-Free Oreo Balls?
Elevate your treat experience with these delightful pairings that will perfectly complement your Oreo balls and create a memorable dessert spread.
-
Fresh Berries: Juicy strawberries or raspberries add a refreshing contrast that cuts through the richness of the chocolatey bites. Their natural sweetness enhances the overall flavor.
-
Ice Cream: Serve alongside a scoop of vanilla or chocolate ice cream for a decadent dessert combination that will please everyone. The creamy texture pairs beautifully with the rich Oreo balls.
-
Nutty Bark: Consider a side of chocolate nut bark—a crisp, crunchy counterpart that offers a delightful textural contrast to the smooth Oreo balls. Each bite will surprise and delight!
-
Coconut Whipped Cream: Light and airy coconut whipped cream adds a light, tropical finish to the indulgent treats. This dairy-free option is perfect for those with dietary restrictions.
-
Coffee or Espresso: A warm cup of coffee or a shot of espresso can balance the sweetness, providing a wonderful palate cleanser. The rich flavors complement the chocolate well.
-
Sparkling Water with Citrus: Refreshing sparkling water with a splash of lemon or lime adds a zesty touch to cleanse your palate and highlight the chocolatey flavors of your dessert.
-
Chocolate-Covered Pretzels: The sweet and salty combo enhances the dessert experience, offering a crunchy texture that contrasts nicely with the creamy Oreo balls.
-
Red Wine: A glass of fruity red wine like Merlot or Shiraz can elevate the experience, enhancing the chocolate notes for an adult twist on the dessert.
Enjoy experimenting with these delicious options to find your perfect match for the indulging sensation of No-Bake Gluten-Free Oreo Balls!
How to Store and Freeze Gluten-Free Oreo Balls
Room Temperature: Keep gluten-free Oreo balls in a cool, dry place for up to 2 hours, but for extended freshness, refrigerate them.
Fridge: Store in an airtight container in the refrigerator for up to 2 weeks. This helps maintain their creamy texture and delicious flavor.
Freezer: For longer storage, freeze the Oreo balls in an airtight container for up to 2 months. Thaw in the fridge before serving for best results.
Reheating: No need to reheat; simply enjoy them cold or at room temperature for a delightful treat!
Make Ahead Options
These gluten-free Oreo balls are a fantastic option for make-ahead dessert lovers! You can prepare the filling mixture up to 24 hours in advance; just roll the Oreo cream balls and store them in an airtight container in the refrigerator. If you prefer, you can also freeze the formed balls for up to 2 months before dipping. To maintain their quality, ensure they are well wrapped to prevent freezer burn. When you’re ready to finish, simply dip the frozen Oreo balls in melted chocolate as instructed and refrigerate for an hour until set. This way, you’ll have a delicious sweet treat waiting for you, perfect for busy weeknights or unexpected guests!
Expert Tips for Gluten-Free Oreo Balls
-
Cream Cheese Care: Ensure your cream cheese is well-softened to achieve a smooth and cohesive mixture. This prevents lumps and creates a creamy base for your gluten-free Oreo balls.
-
Freezing Matters: Don’t skip the freezing step! It helps the balls maintain their shape during the chocolate dipping process, ensuring a perfect presentation.
-
Store Fresh: Keep finished Oreo balls in an airtight container in the refrigerator to maintain freshness. They can last up to two weeks, perfect for planned cravings or unexpected guests!
-
Chocolate Choice: Choose your chocolate wisely! Dark chocolate adds a rich flavor contrast, while white chocolate offers sweetness. Mixing varieties can make for a visually stunning treat.
-
Avoid Sticky Hands: Lightly dampen your hands when rolling the Oreo balls to prevent sticking, making the shaping process much easier and cleaner.
Gluten-Free Oreo Balls Recipe FAQs
What kind of Oreo cookies should I use?
Absolutely! For this recipe, it’s essential to use gluten-free Oreo cookies as the base. However, if you prefer, you can also use any other gluten-free chocolate sandwich cookies. Ensure they have a similar texture and sweetness to achieve the best flavor in your Gluten-Free Oreo Balls.
How should I store leftover Gluten-Free Oreo Balls?
It’s very easy! Store your finished Gluten-Free Oreo Balls in an airtight container in the refrigerator for up to 2 weeks. This will keep them fresh and maintain their creamy texture. If you want to keep them for longer, they can be frozen for up to 2 months. Just ensure to place them in a single layer to prevent sticking!
Can I freeze the Gluten-Free Oreo Balls?
Yes, you can! To freeze your Gluten-Free Oreo Balls, place them in a single layer in an airtight container or freezer-safe bag. Make sure to separate layers with parchment paper if stacking. They can last in the freezer for up to 2 months. When you’re ready to enjoy them, simply thaw in the fridge for a few hours before serving.
What should I do if the mixture is too crumbly?
If you find your mixture is too crumbly and not holding together well, it’s likely that your cream cheese isn’t soft enough. Try mixing in a little more softened cream cheese, one tablespoon at a time, until the mixture reaches a cohesive dough consistency. Remember, soft cream cheese is key to binding your Gluten-Free Oreo Balls together!
Are these Gluten-Free Oreo Balls safe for people with allergies?
A great question! While these Gluten-Free Oreo Balls are free from gluten, they do contain dairy due to the cream cheese and potentially come into contact with nuts if you use certain chocolates, so always check the labels before serving. If you need a dairy-free option, consider using a vegan cream cheese which can make these delightful treats suitable for various dietary needs!
Can I use different types of chocolate for coating?
Absolutely! You can experiment with different types of chocolate for coating your Gluten-Free Oreo Balls. Dark chocolate can add a rich, bittersweet flavor, while milk chocolate offers sweetness, and white chocolate gives a creamy contrast. You can even mix chocolates or add flavorings like peppermint extract for a seasonal twist!

Irresistible Gluten-Free OREO Balls for Effortless Indulgence
Ingredients
Equipment
Method
- Crush the Oreo cookies in a food processor until finely crushed.
- Combine the crushed Oreo cookies with softened cream cheese until well mixed.
- Roll the mixture into 1-inch balls and place them on a parchment-lined baking sheet.
- Freeze the balls for 15 minutes to help them firm up.
- Melt the chosen chocolate in a microwave-safe bowl, stirring until smooth.
- Dip each frozen Oreo ball in melted chocolate and return to the baking sheet.
- Drizzle any remaining chocolate over the balls and garnish with crushed Oreo crumbs if desired.
- Chill the finished balls in the refrigerator for at least one hour before serving.
Leave a Reply